
折腾windows 10中的WSL2
和VMware的冲突解决
安装了win10的2004预览版之后,由于wsl2的支持,自动开启了hyper-v,导致跟vmware发生冲突竞争
据说VMware15.5.5以上可以兼容,暂未测试。
想要正常VMware,需要关闭功能,使用管理员权限打开Windows Terminal:
bcdedit /set hypervisorlaunchtype off
如果需要使用使用wsl2和docker,打开:
bcdedit /set hypervisorlaunchtype auto
每次调整都需要重启才能生效
和代理软件的冲突
https://github.com/microsoft/WSL/issues/4177
由于Proxy,出现的错误提示:
参考的对象类型不支持尝试的操作。
[process exited with code 4294967295]
www.proxifier.com/tmp/Test20200228/NoLsp.exe
使用root权限运行以下语句,解决问题:
.\NoLsp.exe c:\windows\system32\wsl.exe
换国内的源
备份:
cp /etc/apt/sources.list /etc/apt/sourses.list.bak
编辑:
sudo vim /etc/apt/sources.list
换源:
deb http://mirrors.aliyun.com/ubuntu/ bionic main restricted universe multiverse
deb http://mirrors.aliyun.com/ubuntu/ bionic-security main restricted universe multiverse
deb http://mirrors.aliyun.com/ubuntu/ bionic-updates main restricted universe multiverse
deb http://mirrors.aliyun.com/ubuntu/ bionic-proposed main restricted universe multiverse
deb http://mirrors.aliyun.com/ubuntu/ bionic-backports main restricted universe multiverse
deb-src http://mirrors.aliyun.com/ubuntu/ bionic main restricted universe multiverse
deb-src http://mirrors.aliyun.com/ubuntu/ bionic-security main restricted universe multiverse
deb-src http://mirrors.aliyun.com/ubuntu/ bionic-updates main restricted universe multiverse
deb-src http://mirrors.aliyun.com/ubuntu/ bionic-proposed main restricted universe multiverse
deb-src http://mirrors.aliyun.com/ubuntu/ bionic-backports main restricted universe multiverse
更新:
sudo apt-get update
sudo apt-get upgrade
配置zsh
sudo apt-get install zsh
chsh -s /bin/zsh
配置代理
由于WSL2更加的独立,所以要单独配置代理。
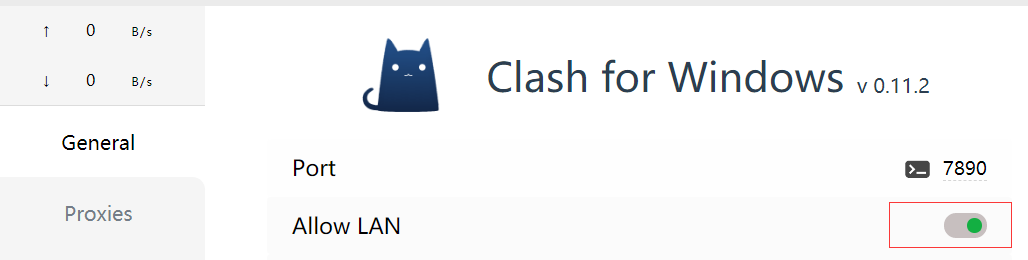
使用的客户端为Clash for windows,打开Allow LAN选项。
运行以下命令获取主机ip:
# 获取主机 IP
# 主机 IP 保存在 /etc/resolv.conf 中
export hostip=$(cat /etc/resolv.conf |grep -oP '(?<=nameserver\ ).*')
配置代理端口,这里我的Clash端口http和socks都是7890,所以设置:
alias setss='export https_proxy="http://${hostip}:7890";export http_proxy="http://${hostip}:8888";export all_proxy="socks5://${hostip}:7890";'
之后调用命令setss即可配置代理,解决github等网站的访问问题。
安装 oh-my-zsh
用于快速配置zsh。
直接用脚本安装即可:
sh -c "$(curl -fsSL https://raw.githubusercontent.com/ohmyzsh/ohmyzsh/master/tools/install.sh)"
安装zsh-syntax-hignlighting:
# 下载
git clone https://github.com/zsh-users/zsh-syntax-highlighting.git

# 移动到 plugins 文件夹中
mv zsh-syntax-highlighting $ZSH_CUSTOM/plugins

# 配置环境变量
cd ~
vim .zshrc

#在 plugins 一列中添加 zsh-syntax-highlighting,如下
plugins=(
         git
         zsh-syntax-highlighting
         )

# 在文件最后添加
source $ZSH_CUSTOM/plugins/zsh-syntax-highlighting/zsh-syntax-highlighting.zsh

# 配置生效
source ~/.zshrc
安装zsh-autosuggestions插件
# 下载
git clone https://github.com/zsh-users/zsh-autosuggestions.git

# 移动到 plugins 文件夹中
mv zsh-autosuggestions $ZSH_CUSTOM/plugins

# 配置环境变量
cd ~
vim .zshrc

#在 plugins 一列中添加 zsh-autosuggestions,如下
plugins=(
         git
         zsh-syntax-highlighting
         zsh-autosuggestions
         )

# 在文件最后添加
source $ZSH_CUSTOM/plugins/zsh-autosuggestions/zsh-autosuggestions.zsh

# 配置生效
source ~/.zshrc
安装neofetch看看效果
apt install neofetch
输入命令neofetch即可看到效果。

安装和配置Docker
sudo apt-key adv --keyserver keyserver.ubuntu.com --recv-keys  [key]
# 设置稳定的存储库
sudo add-apt-repository \
   "deb [arch=amd64] https://download.docker.com/linux/ubuntu \
   $(lsb_release -cs) \
   stable"

# 更新 apt 包索引
sudo apt-get update

# 安装最新版本的 Docker 和 containerd
sudo apt-get install docker-ce docker-ce-cli containerd.io
由于WSL2不能使用systemctl,这里使用命令sudo service docker start启动docker。可以使用命令service --status -all查看所有服务的状态。
运行docker run hello-world进行测试。
技巧
使用 Windows 应用和工具(如文件资源管理器)访问Linux根文件系统。
# 切换到根目录
cd ~
# 句尾有个点
explorer.exe .
使用VS Code 连接WSL
下载插件WSL。
左下角点击进行连接即可。
会打开一个窗口访问的是WSL系统。